In this guide, you'll find everything you need to know about brownies! You'll find answers to questions like 'What makes a brownie a brownie?' as well as the types, variations & baking techniques for brownies. We'll also go into ingredient deep dives and troubleshooting tips so you can master the art of baking brownies once and for all!
When it comes to desserts, the rich, chocolatey goodness that is a freshly baked brownie is unbeatable! They're not quite a cake, not quite a cookie, but something deliciously in between. Whether you love them fudgy (like me) or cakey, with filling or without, brownies are a home-baking staple that everyone should know how to make.
What makes a Brownie a Brownie?
Describing a brownie seems obvious, but I felt it was important for any new bakers who might be reading this. We know they're something between a cake and a cookie, but what are they exactly?
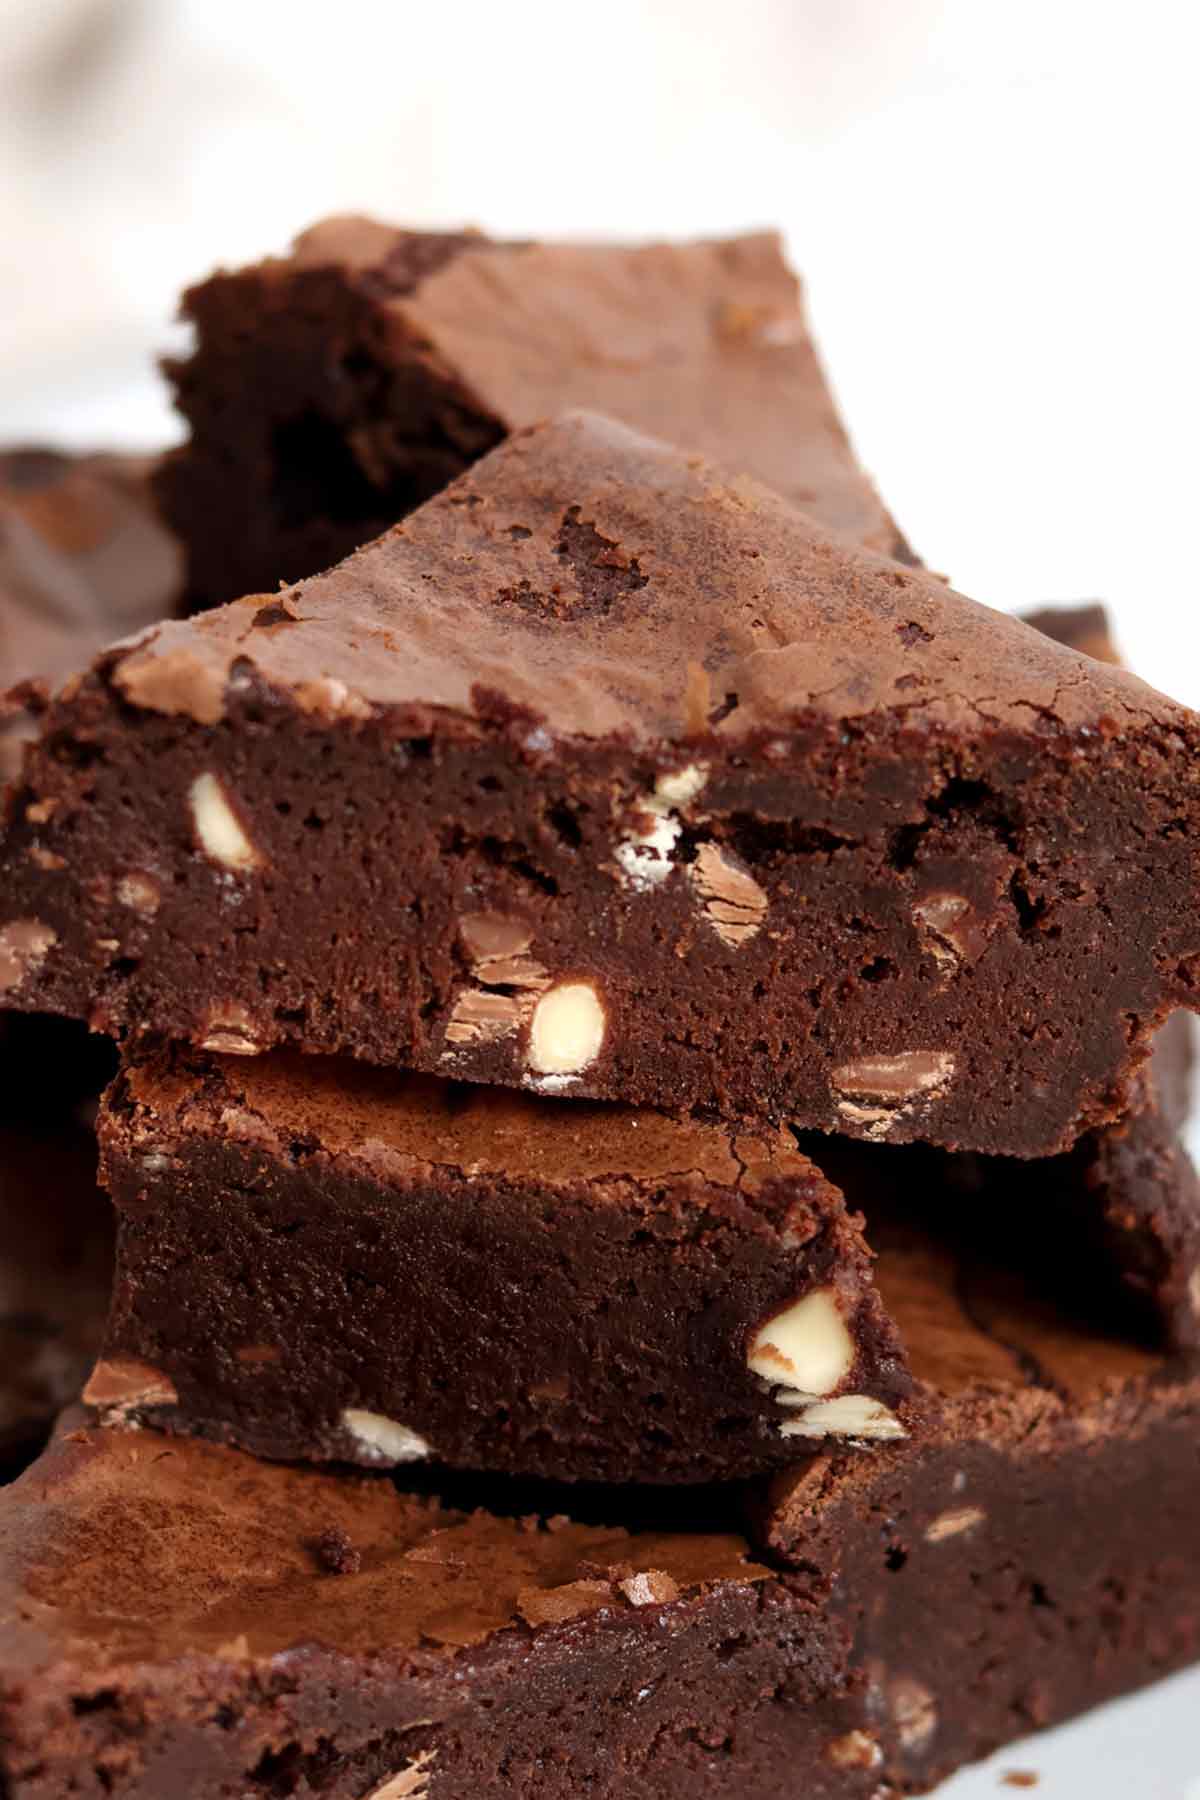
In my opinion, the best description of a brownie is: A dense, chocolate-based baked dessert that combines the richness of a chocolate cake with the chewy texture of a cookie. What makes them special is their unique prep method and combination of ingredients, which can be altered to create a texture that is either dense and fudgy or light and cakey, depending on your preference.
If I were to create a listicle on how to define a great brownie, it would be:
- A high chocolate and/or cocoa powder content
- A dense texture that's usually much more compact than cake
- A shiny, slightly crackled top crust
- A rich, intense chocolate flavour
- A square, rectangular or triangular shape when cut
- A height that's typically around 1 inch
Wow. Who knew brownies were so specific?!
Essential Factors That Define a Brownie
The above description of a brownie is usually enough but when it comes to actually baking them, it's helpful to break it down into more detail. Below I've written about the essential factors that define brownies, which I hope you'll find helpful for quality checking and troubleshooting.
Understanding these basics helps you not only make better brownies but also customise them to your preference. Want them fudgier? Crank that fat ratio up! Or, if you prefer them cakier, add a bit more flour. It's all about finding the perfect balance for your personal taste buds.
Fat-to-Flour Ratio
This is THE most important factor in brownie making. The ratio between your moisture-rich ingredients (like butter, oil, and melted chocolate) and flour determines whether your brownies will be fudgy or cakey. If you don't use enough fat, your brownies will turn out crumbly and cake-like. On the other hand, if you use too much, you'll end up with soft, greasy brownies.
Here are the key ratios I recommend to achieve different brownie styles. Keep in mind that Brownies are very much down to personal preference, but these are good starting points. You can experiment more each time you bake them.
- Chewy brownies: A more balanced ratio. A chewy brownie will have roughly a 2:1 fat-to-flour ratio, for example, 150g chocolate, 50g butter and 100g flour. This is the most common type of brownie you'll find in shops and supermarkets. In my opinion, this ratio is the best place to start before you start experimenting with fudgier or cakier versions.
- Fudgy brownies: A higher fat-to-flour ratio. For the classic fudgy brownie, a fat-to-flour ratio of roughly 4:1 is a great place to start (note that this is total fat-containing ingredients, not actual fat content). For example, in my fudgy brownies, I use 200g dark chocolate and 180g butter (total 380g fat) and 100g of plain flour. If you want to enhance the fudgy texture even more, you can add an extra tablespoon of butter or reduce the flour by a tablespoon or two. The 4:1 ratio is my personal sweet spot and my brownies get rave reviews from anyone who tries them. The fat content can be upped a little more for fudgy brownies but I recommend starting with the 4:1 ratio and adjusting your next batch if needed.
- Cakey brownies: A higher flour-to-fat ratio. A typical cakey brownie recipe typically uses something closer to a 1:1 fat-to-flour ratio, for example 150g of butter to 150g of flour. You can also use oil instead of butter in this type of brownie to create a softer, more cake-like crumb, although amounts will vary from recipe to recipe.
The key to success is maintaining consistent ratios while ensuring proper moisture balance from your fats.
Things to Remember:
- Fudgy brownies: Higher fat (chocolate and butter) to flour ratio
- Cakey brownies: Higher flour-to-fat ratio
- Chewy brownies: Balanced ratio
Chocolate Content
The type and amount of chocolate you use isn't just about flavour- it drastically affects your brownie's texture too. Experienced bakers typically work with three main approaches:
- Pure melted chocolate: Using melted chocolate (typically 60-85% dark chocolate) contributes both flavour and fat through its cocoa butter content. For fudgy brownies, you'll want around 200g of dark chocolate per 8-inch square tin, balanced with the right amount of butter to achieve that perfect fat-to-flour ratio I mentioned earlier. The cocoa butter in the chocolate is a crucial part of your overall fat content- this is why lower-quality, cheap chocolate bars usually don't work well in brownies. Check out my guide on the best chocolate to use for brownies.
- Cocoa powder only: Cocoa powder creates a more intense chocolate flavour since it's concentrated and is much lower in fat. This makes it perfect for recipes where you want to control the fat content using butter only. For an 8-inch tin, recipes typically use 65-75g (⅔-3/4 cup) of cocoa powder, adjusted based on whether you're making fudgy or cakey brownies. Dutch-processed cocoa provides a smoother, deeper flavour, while natural cocoa gives a more fruity chocolate taste.
Many recipes (including most of mine) combine both chocolate and cocoa powder to balance out the flavour and texture. It's common for bakers to use some melted chocolate for richness and structure, then add cocoa powder to intensify the chocolate flavour. Just remember that when using both, you'll need to adjust your butter content accordingly since the chocolate contains a lot of fat on its own.
Remember:
Melted chocolate contributes to the overall fat content as it contains cocoa butter, while cocoa powder allows you to control the fat content more precisely through butter alone. This is crucial when aiming for specific textures like the fudgy, cakey, or chewy brownies I mentioned in the ratio section.
Size and Shape
Getting your dimensions right is crucial for that perfect brownie texture. While you can of course experiment, I recommend using the following basic measurements as a guide to get consistent, repeatable results.
Baking tin
The size of tin you use really matters. If you use a size that is different from what your recipe recommends without making any other adjustments, you might end up with brownies that are too thin, underbaked or burnt.
An 8x8-inch tin is perfect for home baking so I recommend starting with this. I find the majority of brownie recipes call for this tin size (as do all of my brownie recipes). If you're feeding a crowd or making brownies for a bake sale, then you might be better off with a larger rectangular tin, such as 13x9 inches.

You can use my cake pan converter to adjust any of my brownie recipes to fit a larger tin. Keep in mind that even after adjusting the ingredient quantities, baking time may vary slightly so make sure to keep an eye on them while they're in the oven.
The height of your tin should be at least 2 inches because brownies rise a bit as they bake. The height is especially important if you're adding a lot of mix-ins or fillings to your brownie batter- we don't want them to overflow!
Finished brownie height
After baking and cutting your brownies, we ideally want each slice to be roughly 1-1.5 inches tall for a nice fudgy bite. Anything smaller than this will be too thin (and probably very dry), and anything thicker may be underbaked in the middle.
Portioning guide
When cutting my brownies, I typically get 16 2x2-inch servings out of an 8-inch tin. I find this to be the perfect serving size- enough to feel like a treat but not too much that you'll feel sick afterwards. From a larger rectangular tin, you can get 24 servings. You can also cut your servings into quarters to make bite-sized brownies or cut them in half to make double the servings in a triangular shape.
A good tip for achieving professional-looking squares is to let the brownies cool completely, then use a ruler to lightly mark out guidelines with your knife on the surface, making small indentations where you plan to cut. To get clean, sharp edges, use a large, sharp knife and wipe the blade clean with a warm, damp cloth between each cut to prevent the brownie from sticking and creating ragged edges.
Remember:
The size of your tin affects baking time and temperature, so always follow the recipe instructions and use the recommended tin size. A larger, shallower brownie will bake more quickly than a smaller, deeper one.
Texture Markers: Troubleshooting Your Brownies
While we've covered what makes a brownie a brownie, let's dive deeper into the specific texture markers that tell you whether your brownies have achieved perfect balance. These are especially useful when troubleshooting.
Edges
- Should be slightly raised (about 5mm higher than the centre)
- Need to be chewy but not hard or crusty
- Must pull away slightly from the tin when fully baked
- Should have a matt finish, unlike the shiny centre
Centre
- Slightly gooey when warm
- Holds shape when cut after chilling
- Should leave a few moist crumbs on a skewer or toothpick when tested
Top Crust
- Look for a paper-thin, shiny surface
- Should show slight crackles
- Must be set but not separated from the brownie beneath
- You can gently press it without leaving a fingerprint
Common Texture Problems and Causes
- Too greasy: This often means your brownies are under-baked or contain too much moisture, which can be caused by too much sugar or poor-quality chocolate. As mentioned in the Fat to Flour Ratio section, the key is to keep the moisture in your brownies balanced.
- Crumbly edges: This is typically due to overbaking or adding too much flour. Always use a food scale to measure your ingredients, and keep a close eye on the brownies while they bake. You can also use an oven thermometer to ensure accuracy.
- Too cakey: This could be due to too much mixing, having the wrong fat-to-flour ratio or overbaking.
- Dense and heavy: This can be down to mixing technique or a lack of flour/cocoa powder.
Remember:
These markers can help you diagnose issues during the baking process. Think of them as your checklist for achieving the perfect brownie texture every time.
Ok! Now that we're done with our detailed brownie description, we can talk about what makes them different from other desserts, as well as some popular variations.
What Makes a Brownie Different from Other Chocolate Desserts?
Let's get a little more specific about what truly sets brownies apart from other chocolatey desserts. In other words, what makes a brownie a brownie? Understanding what makes them unique is really important to getting the right brownie consistency. After all, we want to make sure we're not just making flat chocolate cakes! It can also help you make adjustments to recipes to achieve your preferred texture, whether you're aiming for fudgy, cakey or something in between. It's all to do with their unique texture profile and preparation method which we'll explore in the sections below.
Brownie vs Chocolate Cake
Is a brownie a cake? Not really. Brownies are different from chocolate cake as they have different compositions and preparation methods. While cakes rely on a balanced ratio of ingredients to achieve a light, airy texture, brownies usually have a higher proportion of fats to flour, creating their iconic dense, rich texture.
The mixing process also plays a crucial role. Unlike cakes that often require creaming and mixing, brownies typically come together by whisking the eggs and sugar then folding in the dry ingredients. They're also usually baked at lower temperatures for longer periods, allowing the chocolate flavour to develop fully.
Things to Remember:
Unlike a cake, a brownie:
- Has a higher fat-to-flour ratio
- Typically contains fewer or no raising agents
- Is denser with a more concentrated chocolate flavour
- Has a unique mixing method
- Is often baked at a lower temperature for longer
Brownies vs Cookies
Next, let's take a look at the difference between a brownie and a cookie. They both have a similar density and texture but obviously, they are not the same thing. The first and most obvious difference is that cookies are individually portioned pieces of dough that spread during baking, while brownies are baked as a single slab and cut after cooling.
The texture difference comes from the ingredient ratios. Cookies typically have a higher flour-to-fat ratio, creating a stiff, mouldable dough that you can roll into balls, while brownies have more liquid ingredients to create a pourable batter for their fudgy interior.
Things to Remember:
Unlike a cookie, a brownie:
- Is thicker and more substantial
- Baked in a pan rather than dropped or shaped
- Has a more cake-like batter
- Has a higher fat content
- Requires cooling before cutting
Types of Brownies
While all brownies have the same chocolatey foundation, they come in many different varieties. Let me walk you through the main types you might come across:
Classic Brownies
Cakey or fudgy? The great brownie debate usually starts right here! These are your basic brownie types and a great place to start if you're new to baking brownies. These follow the basic ingredients and classic ratios:
Fudgy Brownies
The richest, densest version of brownies (and my favourite). They're like a cross between chocolate cake and fudge and have a higher ratio of fats (butter and dark chocolate) to flour.
Cakey Brownies
These are lighter and fluffier than fudgy brownies, with a texture that is more similar to a dense chocolate cake. They are typically made with more flour and sometimes include a leavening agent like baking powder.
Chewy Brownies
As the name suggests, these have a chewy texture, with a bit more structure than fudgy brownies but more density than cakey ones. They're a great middle ground if you're not sure which kind to try first.
Popular Brownie Variations
Once you've nailed the basics, you can move on to experimenting with flavour variations.
Mix-In Brownies
These brownies follow your basic recipe but include additional ingredients folded into the batter. The key is knowing when and how to add your mix-ins.
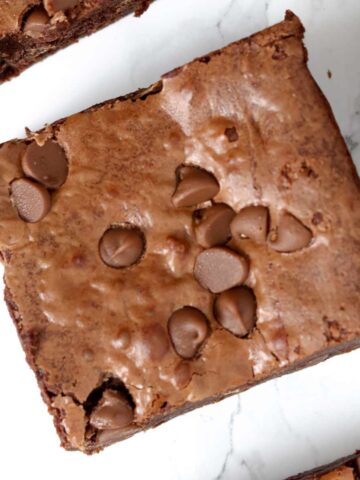
- Chocolate Chips: These are a classic brownie mix-in for good reason! I recommend using 100g-150g (3.5-5oz) of chocolate chips per 8-inch tin. Dark, milk, or white chocolate all work beautifully.
- Nut Brownies: Toasted nuts (especially walnuts and pecans) add amazing texture and flavour to brownies. Toast them first at 180°C (350°F) for 8-10 minutes, then cool completely before folding them into your batter. Use up to 150g (5oz) of nuts per 8-inch square tin.
- Cream Cheese: Drop spoonfuls of softened cream cheese mixture (cream cheese, sugar, and egg) on top of your batter and swirl with a toothpick. Make sure the mixture is at room temperature for easy swirling.
- Nut butters and dessert spread: Peanut butter, Nutella, Biscoff spread... anything you fancy! Place a few tablespoons into a heatproof bowl and pop it in the microwave for 10-20 seconds until runny. Drizzle it over your brownie batter then use a toothpick to swirl it into a pattern.
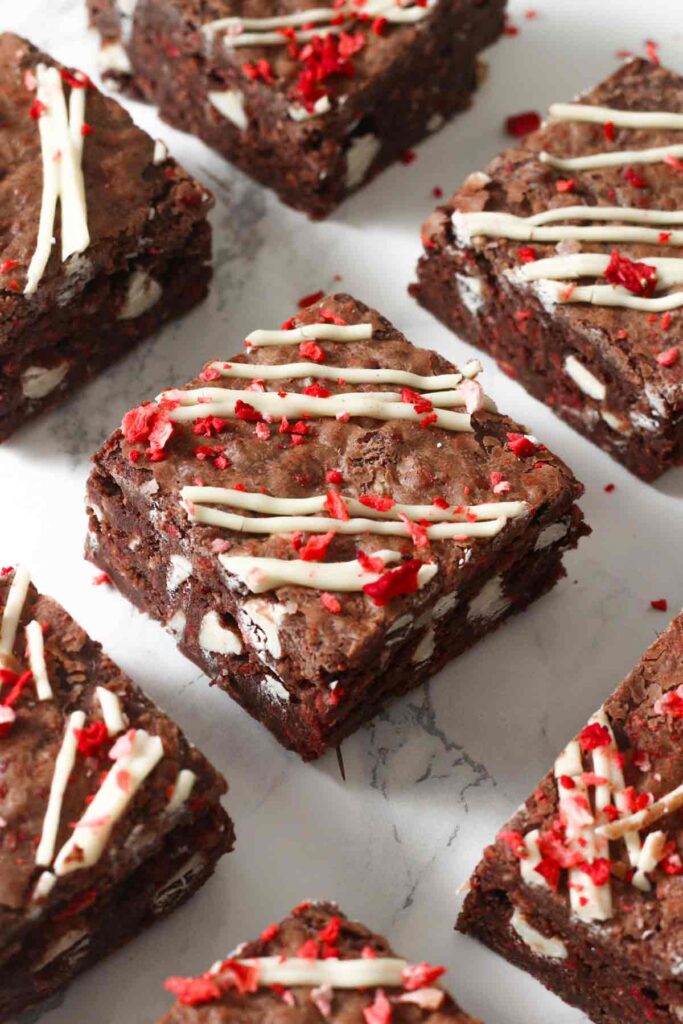
- Freeze-dried fruit: If you haven't tried my strawberry white chocolate brownies yet, you need to try! The batter has white chocolate chips and freeze-dried strawberry pieces in it, and the flavour really comes through!
- Chocolate Bars: Chop up your favourite chocolate bars and fold them into your brownie batter before baking. Be careful with chocolate bars containing caramel or wafer as they can burn if they're not fully covered with the batter.
Check out my mix-in brownie recipes for inspiration:
- Kinder Bueno Brownies
- Milky Bar brownies
- Honeycomb brownies
- Malteser brownies
- After Eight brownies
- Rolo brownies
- Reese's peanut butter cup brownies
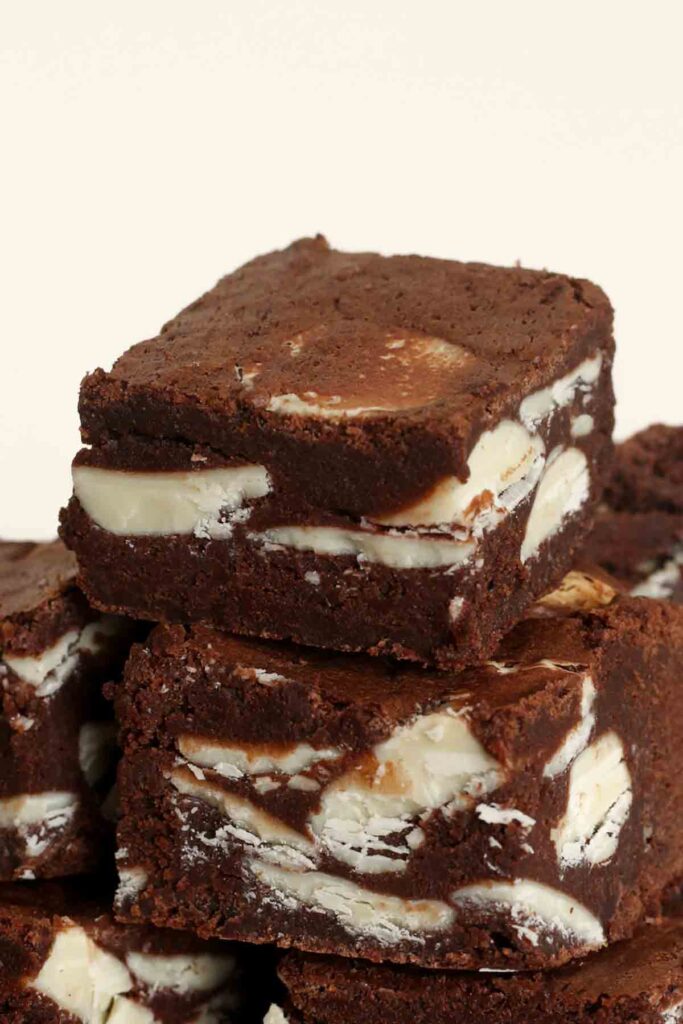

Stuffed Brownies
Here's the general method for stuffed brownies:
- Prepare your filling first and let it cool if needed.
- Make your brownie batter as normal.
- Pour half the brownie batter into your lined tin.
- Add your filling, leaving a small border around the edges.
- Cover completely with remaining batter.
- Test doneness by inserting a skewer near the edge, not in the centre where the filling is.
And a few ideas...
- Cookie Dough Stuffed: Pour half your brownie batter, add a layer of chilled cookie dough then top with remaining brownie batter.
- Nutella or Biscoff-filled: Spread a square of Nutella or Biscoff spread onto a sheet of baking paper and freeze until solid. Pour half your brownie batter into the tin, top with the frozen slab then cover with the remaining brownie batter.
- Nut butter: Similar to the Nutella method, freeze your nut butter in a slab before adding it to the centre of the brownie batter.
- Caramel: Pour half the brownie batter into your tin, top with a thick layer of homemade or canned caramel then swirl the remaining batter in using a toothpick.
- Chocolates: Add entire chocolate bars to the centre of your brownie mix for a more striking look. Try experimenting with Twix, Kinder Bueno, Bounty bars or whole peanut butter cups.
Check out my stuffed brownie recipes:

Topped Brownies
These kinds of brownies can be topped with an additional layer before or after baking.
- Frosted: Always cool your brownies completely first, otherwise your frosting will melt. For a more polished look, chill the brownies again in between frosting and cutting. If you don't want too much frosting, you can do a small drizzle instead. You can either leave them frosted as is or use the frosting as 'glue' to stick on extra chocolates or decorations. Check out my Thanksgiving brownies for inspo.
- Ganache-topped: Use a 1:1 ratio of dark chocolate to double cream for the perfect silky ganache. Pour it over your cooled brownies and refrigerate until set.
- Fudge-topped: Ever thought about adding a layer of fudge on top of brownies? I did this for my Cookie Monster brownies and they turned out absolutely delicious! Bake your brownies as normal, prepare your fudge layer, pour it on top then refrigerate the brownies overnight to set. It doesn't matter too much if the brownies are cold or warm when you add the fudge.
- Salted Caramel: Add caramel sauce after baking, while the brownies are still warm. The heat helps it sink in slightly and stick a little better. Finish it off with flaky sea salt just before serving.
- Peanut butter: Like I did with my peanut butter pretzel brownies, you can swirl some peanut butter on top of the brownie batter before baking. You can also do this with Biscoff spread, jam, Nutella and other kinds of nut butters. Be careful not to use too much as it'll make the brownies soggy- just a few teaspoons usually does the job.
- Candy and cookies: Last but not least, you can also top your brownies with chocolate bars, candies or cookies. Place them on top of the brownie batter before baking as normal. See my Halloween Oreo brownies, Bourbon biscuit brownies, Creme Egg brownies and Malteser Bunny brownies for inspo!

Special Brownies
Some variations require specific ingredient substitutions or unusual methods:
- Gluten-Free: Use a good quality gluten-free flour blend that contains xanthan gum. This will prevent the brownies from crumbling.
- Vegan: Replace eggs with flax eggs or buttermilk and use dairy-free dark chocolate and vegan butter.
- Brownie pops: While your brownies are still warm, mash them up in a bowl using a fork to make a paste-like mixture. Take tablespoons of the mixture and roll into balls. Push a lollipop stick into the balls then dip them in melted chocolate. You can use a traditional recipe or box mix to make brownie pops.
- 3-Ingredient brownies: Did you know you can make quick and easy brownies using condensed milk? All you need to do is combine flour, dark chocolate and condensed milk then bake for 20-25 minutes.
Chocolate variations in brownies
The type of chocolate you use dramatically affects your brownies' flavour profile and texture:
- Dark Chocolate Brownies: This is the most common type of brownie that you'll find in bakeries and recipe books. They have a rich, intense flavour that can taste a little bitter to some.
- Milk Chocolate Brownies: Using milk chocolate creates a sweeter, more mellow brownie that children particularly enjoy. Milk chocolate brownie recipes often use less sugar and more fat to compensate for the excess sweetness and lack of cocoa butter. These brownies tend to be softer, so may need extra chilling before cutting.
- White Chocolate Brownies: These can sometimes be called blondies (although just to confuse you, blondies can also be made without chocolate). They have a similar texture to dark chocolate brownies but more of a gentle, caramel-like flavour. If you're a beginner, I recommend reading through the notes and tips on my matcha white chocolate brownies post to get you started.
- Cocoa Powder Brownies: This type of brownie doesn't actually use any chocolate and instead relies solely on cocoa powder. These have an intense chocolate flavour and slightly drier texture. They're great for recipes that you need a softer brownie for, such as trifle layers or brownie balls. Make sure to check out my chocolate-free brownie recipe!

Freezing and storing
Brownies keep and freeze surprisingly well, which is great news if you love baking ahead or saving leftovers. The key is wrapping them tightly and keeping air out to lock in that fudgy texture.
At room temperature, they'll usually last 2-5 days (depending on the recipe), a week or two in the fridge, and up to 3 months in the freezer. If you want a full breakdown- including how to wrap them, how to freeze different types of brownies, how to defrost without them going soggy, and even tips for reheating, I've written an entire post all about how to store brownies properly.
The History of Brownies
Now that we've covered the key techniques to making brownies, let's talk about where they come from.
So, where do brownies come from? Well, Brownies are actually an American dessert, and many agree that they originate from New England. According to The Nibble, the first recorded "brownie" recipe showed up in a Boston Cooking-School Cook Book in 1896. But here's the twist...it wasn't the chocolatey treat we know today. That first version was more like a molasses cake and didn't even contain any chocolate at all (shocking, I know!).
There are a few different stories about who invented the first chocolate brownie. The one that's probably most accepted traces back to the Palmer House Hotel in Chicago. In 1893, the hotel's chef was instructed to come up with a new dessert to serve at the Columbian Exposition World's Fair. The result was a rich, dense chocolate bar topped with walnuts and an apricot glaze. That was the original Palmer House Brownie, and you can still try it today at the hotel!
There's one more fun story about a housewife in Bangor, Maine, who supposedly forgot to add baking powder to her chocolate cake. Instead of rising, her cake stayed dense and flat, but everyone actually loved it! While I can't say for sure if this really happened, I love the idea that one of my favourite desserts might have been a happy accident.
What we do know for sure is that by the early 1900s, brownies were becoming super popular. Around 1905-1906, the first real chocolate brownie recipes started popping up in cookbooks and newspapers across America, and they've been enjoyed ever since. So while we might not know for certain who invented the first ever brownie, we can thank those creative American bakers of the 19th century for giving us this incredible dessert. And to be honest, I think the mystery around brownies just makes them even more special!
Final thoughts
There we have it: everything you need to know about brownies! Once you understand the key elements like fat-to-flour ratio, chocolate quality, and baking techniques, the (baking) world really does become your oyster! Whether you're a first-time baker or a seasoned pro looking to perfect your signature brownie, I hope this guide helps you bake with more confidence, creativity, and of course, delicious results!


Leave a Reply