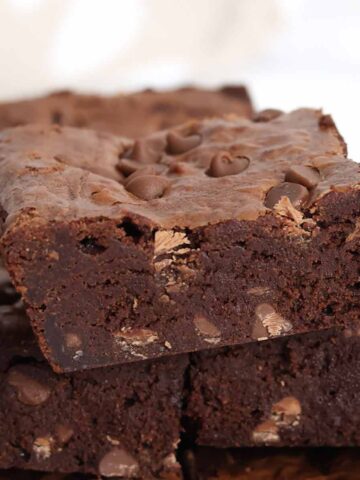
These Bounty brownies are a must-try dessert for any coconut lovers! They're rich and fudgy, jam-packed full of milk chocolate chips and Bounty bars. They're surprisingly easy to make and they're sure to become a new favourite treat!

Say hello to your new favourite dessert: chocolate coconut Bounty brownies! They are everything a good brownie should be... sweet, rich, fudgy and slightly chewy. I can't wait to show you how to make them!
These brownies are perfect for any occasion, whether you're hosting a party, need something for a bake sale, or simply craving something sweet after dinner. They're a foolproof way to impress your friends and family with something that looks (and tastes) like it took a lot more effort than it actually did!
Below you'll find everything you need to know about how to make coconut brownies. This includes ingredient and equipment notes, step-by-step photos, my top tips and more. If you'd prefer the condensed, bullet-pointed version, you can find it in the recipe card at the end of the post. Otherwise, just keep on reading. Enjoy!
Ingredient notes
Here's what you'll need to make these delicious Bounty brownies...
- Dark chocolate: The base of any good brownie! For best results, you'll need to use 70% dark chocolate, or as close to it as you can get (65% or 73% dark chocolate for example). This is because I tested the recipe with 70% chocolate and the amount of sugar and butter in the recipe has been adjusted accordingly. If you use chocolate with a higher cocoa content, the brownies will taste a little bitter, while chocolate with less cocoa (which has extra sugar) will cause oily brownies.
- Butter: I always use unsalted butter in my brownies but feel free to use salted if you prefer. You'll need 180g of it.
- Sugar: Caster sugar of course provides sweetness in the recipe. As I mentioned above, too much sugar will cause the brownies to become oily (and they likely won't set properly) so make sure to weigh it accurately.
- Eggs: Eggs act as a binder in the recipe and give the brownies their structure. You'll need 3 medium eggs.
- Flour: Always use plain/all-purpose flour in brownies rather than self-raising. The latter contains baking powder and will make the brownies more cakey than fudgy.
- Vanilla extract: 1 teaspoon, for extra flavour.
- Bounty bars: Of course, we need some Bounty bars to make Bounty brownies! I used 9 duo bars in total, which is 18 individual pieces (513g total).
- Chocolate chips: These will add extra sweetness and help with that classic brownie crust. You can use milk, dark or white chocolate chips- whatever you like best.
Equipment
There aren't a whole lot of tools required to make these brownies, but here's a list of what you will need:
- Mixing bowl: A large bowl to mix the batter in.
- Utensils: A wooden spoon for mixing, a teaspoon and tablespoon for measuring, and a sharp knife for cutting the brownies.
- Saucepan: For melting the chocolate and butter together.
- Electric whisk: You can whisk the eggs and sugar by hand but it is very tedious, so I recommend using an electric hand whisk or stand mixer for ease.
- 8x8 tin: The perfect size for a nice, thick brownie. If you'd like to use a different size of tin, use my cake pan converter tool to adjust the ingredient quantities.
- Baking paper: This will make it much easier to get the brownies out of the tin! I recommend leaving a bit hanging over each edge so you can just lift them out.
- Kitchen scale: I haven't included imperial measurements for this recipe because accuracy is super important.

How to Make Bounty Brownies
Ready? Let's get baking!
Step 1: Start by preheating your oven to 160°C (140°C if you're using a fan oven) and line an 8x8-inch tin with baking paper.
Step 2: Next, break 200g of 70% dark chocolate into pieces and place into a saucepan with 180g of unsalted butter. Put the saucepan over low heat on the stove and stir gently until the butter and chocolate have melted.
Remove it from the heat and leave it to cool for 5-10 minutes until it reaches room temperature. This will prevent it from scrambling the eggs in the next step!
Step 3: To a large mixing bowl, add 250g of caster sugar, 3 medium eggs and 1 teaspoon of vanilla extract. Use an electric whisk to whisk them all together for a few minutes, until the mixture becomes pale and voluminous.

Step 4: Pour the melted chocolate/butter mixture into the bowl and gently fold it in using a whisk or wooden spoon.

Step 5: Add 100g of plain flour and 1 tablespoon of cocoa powder and fold that in too (folding rather than beating will help to give your brownies that lovely crust on top). Then mix 75g of milk chocolate chips into the brownie batter.

Step 6: Pour half of the batter into your tin and spread it out to the edges. Place the Bounty bars on top then cover with the remaining batter and spread it out evenly. If you need to, you can cut some of the Bounty bars to make them fit, as pictured below.

Step 7: Bake your brownies for 35-40 minutes until they have formed a crust on top and are pulling away from the edges slightly.
Step 8: Let them cool in the tin then pop them in the fridge to set. 6 hours will be enough time if you're in a hurry but I recommend leaving them overnight for best results.
Step 9: Once set, pull the brownies out of the tin, cut them into squares or triangles, and enjoy!
Tips for Perfect Brownies
- Use 70% dark chocolate (I like Lindt). Chocolate with higher or lower cocoa content can cause bitter or oily brownies.
- Whisk the sugar and eggs together properly using an electric whisk. The more the sugar dissolves, the better the final result will be.
- Set the brownies in the fridge overnight for the perfect fudgy texture.
- For extra clean slices, use a warm knife. You can warm your knife by running it under boiling water and drying it thoroughly before each slice.
FAQs
Store them in an airtight container in the fridge, where they'll keep for up to 2 weeks. They can also be kept at room temperature if necessary but the texture won't be quite as fudgy.
These coconut brownies are rich and indulgent, so they're best served in small slices. I typically cut mine into 16 squares but you can cut the squares into halves to make 32 triangles- perfect for serving a crowd!
Yes, they can be frozen for up to 3 months. You can either freeze them in airtight containers or you can freeze the whole brownie slab wrapped tightly in clingfilm. To defrost them, pop them in the fridge and leave them to thaw overnight. Do not refreeze. Check out my storing brownies guide for more.

More brownie recipes:
- Peanut butter pretzel brownies
- Jaffa Cake brownies
- Strawberry and white chocolate brownies
- Mars Bar brownies
- Maltesers brownies
- After Eight brownies
- Cookie Monster brownies
If you try these Bounty brownies at home, let me know what you think by leaving a rating and comment below. Enjoy!

Bounty Brownies (Chocolate & Coconut)
Ingredients
- 200 g 70% Cocoa dark chocolate
- 180 g Butter
- 250 g Caster sugar
- 3 Medium Eggs
- 1 Teaspoon Vanilla extract
- 100 g Plain flour
- 1 Tablespoon Cocoa powder
- 75 g Milk chocolate chips
- 9 Duo Bounty bars (18 pieces altogether, 513g total)
Instructions
- Preheat your oven to 160℃ (140℃ for fan ovens) then line an 8x8-inch tin with baking paper.
- Melt the dark chocolate and the butter together over low heat. Leave to cool for 5-10 minutes until it comes to room temperature.
- In a large bowl, whisk together the sugar, eggs and vanilla extract using an electric whisk. Keep whisking for a couple of minutes until the mixture becomes pale and voluminous.
- Fold the melted chocolate mixture into the egg and sugar mixture using a wooden spoon. Then mix in the flour and the cocoa powder.
- Stir in the chocolate chips.
- Spoon half of the batter into the tin and spread it out to the edges. Place the Bounty bars on top then cover them with the rest of the batter. You can cut off pieces of the bars if they're too large to fit all the way to the edges.
- Bake the brownies for around 35-40 minutes until the edges are risen and pulling away from the tin slightly. Let them cool in the tin then transfer them to the fridge to set, ideally overnight but for at least 6 hours.
- Once set, cut them into slices and enjoy!
Video
Notes
- Store in an airtight container in the fridge for up to 2 weeks.


Leave a Reply