These Jaffa Cake brownies are fudgy, chewy and packed full of chocolate orange flavour. They're made with real Jaffa Cakes and milk chocolate chips for a delicious dessert that you'll want to bake again and again.

I've written many times before on this blog about how much I adore chocolate brownies but I have to admit, chocolate orange brownies are just my absolute favourite. These Jaffa Cake brownies are going to be your new favourite dessert too, I just know it!
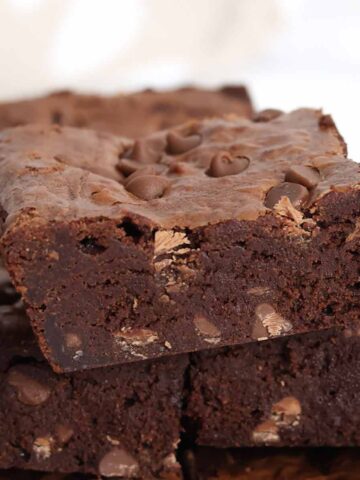
The brownies are flavoured with orange extract and they're full of milk chocolate chips for added texture. There are 3 layers of whole Jaffa Cakes packed inside and I think they look incredible once they're cut into! These would be perfect for BBQs, after-dinner desserts, bake sales, or any other occasion that requires dessert. I can't wait for you to try them!
If you're a beginner baker and need a little extra guidance, you can find detailed notes and instructions in the post below, as well as my top tips and step-by-step photos. Otherwise, just scroll to the end of the post to find the condensed version in the recipe card. Enjoy!
Ingredients
Here's what you'll need to make Jaffa Cake brownies...
- Dark chocolate: For this recipe, it's best to use 70% cocoa dark chocolate or as close to this as you can find. Chocolate such as 65% or 73% will work fine but something like 50% or 85% will not be great. This is due to the sugar and fat content, which can skew the texture and flavour.
- Butter: Melted butter is mixed with the dark chocolate to give the brownies a rich, fudgy base. Unsalted butter is best for this recipe- it's best to add just a pinch of salt to the batter if you want to.
- Sugar: For brownies, use caster sugar as it will dissolve into the eggs a lot easier. If the sugar grains are not dissolved enough then you can end up with oily brownies. Caster sugar is a finer version of granulated white sugar, also known as superfine sugar.
- Eggs: The eggs give this recipe structure and slight leavening, meaning the brownies will form a nice crust without becoming cakey. You'll need 3 eggs.
- Orange extract: This really helps to bring the flavours in the chocolate and the Jaffa Cakes together. I found 1 teaspoon to be plenty.
- Flour: Plain flour is best for this recipe. Self-raising flour can cause cakey brownies and that's not the vibe we're going for here!
- Cocoa powder: This helps to deepen the chocolate flavour without drastically changing the fat (or sugar) content. 1 tablespoon is the perfect amount for this recipe.
- Milk chocolate chips: These are optional but I recommend them for extra flavour and texture. If you can find them, orange chocolate chips would be a great idea!
- Jaffa Cakes: These brownies are stuffed with 3 layers of Jaffa Cakes, which ensures you get a burst of gooey orange goodness in every bite. I used 27 in total but you can squeeze more pieces around the sides if you want to.
Equipment
Here are all the kitchen tools you need for this recipe...
- 8x8-inch baking tin: This is the best size of tin to use for brownies! If you use a large or smaller tin, the baking time and temperature may need to be adjusted, so use 8x8-inch if you can. You can still get 18 decently-sized brownies from this recipe.
- Baking paper: To stop the brownies from sticking to the tin. It helps to leave a little bit hanging over each edge of the tin so you can just lift it out later.
- Saucepan: This recipe requires you to melt the butter and chocolate together so you can either do this over the stove in a saucepan or you can put it in the microwave in a heatproof bowl. Just make sure to stir it often so it doesn't burn.
- Utensils: A wooden spoon, a few smaller spoons and a sharp knife.
- Mixing bowl: A large one, to make the brownie batter in.
- Electric hand whisk: To whisk the sugar into the eggs. You can also use a stand mixer if you have one.

How to make Jaffa Cake brownies
Step 1: First, let's start by preheating the oven to 160°C (or 140°C if you're using a fan oven. Then line an 8x8-inch tin with baking paper.
Step 2: Next, we'll melt the chocolate and butter. Add 200g of 70% dark chocolate to a saucepan along with 180g of cubed butter. Place the saucepan over low heat on the stove and stir occasionally until there are no lumps left.
Remove it from the heat and leave it to cool for around 10 minutes. This will stop the heat from cooking the eggs in the next step.
Step 3: In a large bowl, use an electric whisk to whisk together 250g of caster sugar, 3 medium eggs and 1 teaspoon of orange extract. Whisk for a minute or two until the mixture increases in volume and becomes pale.

Step 4: Pour the cooled melted chocolate mixture into the bowl and stir it in gently. Then mix in 100g of plain flour and 1 tablespoon of cocoa powder to make a shiny, glossy brownie batter.

Step 5: Stir 100g of milk chocolate chips into the batter.
Step 6: Place around ⅓ of the batter into your lined tin and spread it out evenly then top with 9 Jaffa Cakes. Repeat this process two more times, finishing with the Jaffa Cakes on top. You'll need 27 Jaffa Cakes in total.

Step 7: Bake the brownies for around 35-40 minutes until a crust has formed on top and the edges have risen. Leave them to cool in the tin then transfer them to the fridge to set overnight. If you're short on time, 6 hours should suffice.
Step 8: Once the brownies have set, remove them from the tin and cut them into 9 squares. Cut each square in half to make 18 triangles and enjoy!
Top tips
- Let the chocolate and butter mixture cool before you add it to the sugar and eggs. If it's too hot, the eggs can start to cook which will throw off the brownie texture.
- Use an 8x8-inch tin that's at least a few inches deep as the Jaffa Cakes will really bulk up the batter.
- It can be tricky to tell when brownies are done- the toothpick test doesn't work because they're supposed to be gooey in the middle at first. Signs to look for are: the brownies have risen, there's a thin crust on top, and there's a very slight wobble in the middle when you gently shake the tin.
FAQ
These brownies won't become firm until you refrigerate them. I put mine in the fridge overnight but you should leave them there for 6 hours at a minimum. When the fats are chilled, the centre will go from soft and gooey to firm and fudgy. Yum!
They'll last for up to 1 week, so long as you keep them in an airtight container in the fridge. For more storing information, check out my post on how to store brownies.
Yes. Freeze your Jaffa brownies in airtight containers for up to 2 months. When you're ready to eat them, leave them to sit in the fridge overnight to defrost. Do not refreeze.

More brownie recipes:
- Rolo caramel brownies
- Mars Bar brownies
- Smarties brownies
- Bourbon biscuit brownies
- Condensed milk brownies
- Bounty brownies
I hope you like these Jaffa Cake brownies! If you make them at home, please let me know how you get on by leaving a rating and comment below. Enjoy!

BEST Jaffa Cake Brownies
Ingredients
- 200 g 70% Cocoa dark chocolate
- 180 g Butter
- 250 g Caster sugar
- 3 Medium Eggs
- 1 Teaspoon Orange extract
- 100 g Plain flour
- 1 Tablespoon Cocoa powder
- 100 g Milk chocolate chips
- 27 Jaffa Cakes
Instructions
- Preheat your oven to 160℃ (140℃ for fan ovens) and line an 8x8-inch tin with baking paper.
- Melt the dark chocolate and the butter over low heat on the stove then leave it to cool for about 10 minutes.
- In a large bowl, whisk together the sugar, eggs and orange extract using an electric whisk. Keep whisking for a couple of minutes until the mixture becomes pale and has increased in volume.
- Add the melted chocolate mixture to the bowl and gently stir it in. Then add the flour and the cocoa powder and mix until well combined.
- Fold in the chocolate chips, leaving a few for the top if desired.
- Spoon ⅓ of the brownie batter into your lined tin and spread it out evenly then place 9 Jaffa Cakes on top. Repeat twice more so you have 3 layers of Jaffa Cakes, with the final layer being on top of the batter.
- Bake the brownies for around 35-40 minutes until the edges are risen and the top has formed a crust. There should be a very slight wobble in the middle but not too much.
- Let them cool in the tin then transfer them to the fridge for at least 6 hours (but ideally overnight) to set.
- Once set, cut them into 9 squares then cut the squares in half to make 18 triangles.
Video
Notes
- Store in an airtight container in the fridge for up to 1 week.


Leave a Reply