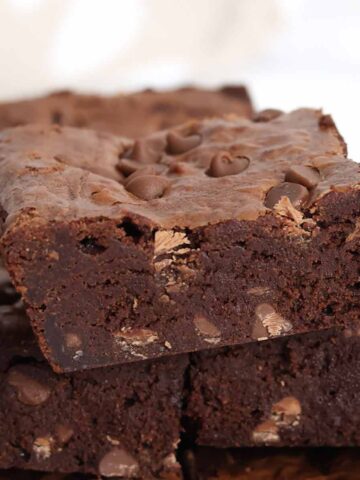
You're going to go NUTS for these easy Reese's peanut butter cup brownies. They're thick, chewy and fudgy, and packed full peanut butter flavour.

I had the idea to make these Reese's peanut butter cup brownies while I was making my peanut butter and Nutella blondies last week. There just isn't a better flavour combination than peanut butter and chocolate for me right now.
I wanted these brownies to be ultra-rich, chocolatey and fudgy with a punch of peanut butter in every bite. And I'm glad to say that I succeeded! I cannot wait for you to try them for yourself. Here's everything you need to know...
Ingredients
Gather all of these ingredients before you begin...
- Butter: Melted butter is one of the main ingredients (alongside the chocolate) that gives these brownies their fudgy texture. You'll need 180g of it- I like salted but you can add a pinch of salt separately if you want to use unsalted.
- Chocolate: Always use dark chocolate for brownies. If you've ever made brownies and had them turn out oily, it was probably because the chocolate you used had too much sugar and not enough fat. I recommend using 70% dark chocolate for this recipe as it's what I always test with, although slight variations such as 65% and 72% chocolate should work fine too.
- Sugar: Caster sugar will give your brownies the best texture because it'll dissolve into the batter more easily than granulated sugar. This type of sugar is also called superfine sugar in some countries.
- Eggs: Eggs act as a binder and a slight leavening agent in this recipe, saving the need to add any baking powder or baking soda separately.
- Flour: Plain or all-purpose flour is the best choice for brownies. They are supposed to be heavy and dense so avoid using self-raising flour, which will result in more cake-like brownies.
- Cocoa powder: Using just a small amount of cocoa powder will enhance the chocolate flavour without making the brownies bitter.
- Peanut butter cups: I used 2 bags of mini Reese's peanut butter cups which weighed 180g in total.
- Chocolate chips: Add some milk chocolate chips for some extra texture and sweetness.
- Peanut butter: For a lovely peanut butter swirl on top. This is optional but is nice to add an extra bit of nutty flavour. I used Whole Earth drizzler which is super easy to drizzle.
Equipment
Aside from the ingredients, you'll also need the following equipment to make these brownies...
- 8x8-inch tin: This is the only tin size I've tested my brownies with but I would imagine it can work with an 8x10-inch tin too (with slightly reduced baking time). If you want to use a tin that's any larger, I'd recommend increasing the ingredient quantities too, to prevent thin or overbaked brownies. You can use my cake pan converter to do this.
- Baking paper: To line the tin with.
- Electric whisk: You'll need an electric whisk or stand mixer to whisk the sugar into the eggs. This will help the sugar to dissolve properly.
- Mixing bowl and utensils: To make these brownies, you need a large mixing bowl, a wooden spoon, a tablespoon or two, a toothpick and a sharp knife.
- Saucepan: For melting the butter and chocolate together. Alternatively, you can do this in a heatproof bowl in the microwave, but make sure to stir it often to prevent burning.
- Food scale: I have included cups and oz measurements in my recipe card but for best results, especially if you're a beginner, use a scale to measure in grams. The final result be way more accurate and more easily repeatable this way.

How to make Reese's peanut butter cup brownies
Ready to get started? Let's get baking!
Step 1: Preheat your oven to 160°C (or 140°C if you're using a fan oven) and line an 8x8-inch tin with baking paper.
Step 2: Break up 200g of 70% dark chocolate into pieces and add it to a saucepan along with 180g of butter. Place it over low heat on the stove and stir gently until it's fully melted and there are no lumps left.
Leave the mixture to cool for around 10-15 minutes, which will ensure the rest of the ingredients don't get cooked by the residual heat.
Step 3: In a large bowl, whisk together 3 medium eggs and 250g of caster sugar. You'll need to use an electric hand whisk or stand mixer for this part. Keep whisking for a few minutes until the mixture becomes pale and increases in volume.

Step 4: Pour the melted chocolate mixture into the bowl with the sugar/egg white mixture and gently fold it in. Then stir in 100g of plain flour and 1 tablespoon of cocoa powder.
Step 5: Next, add 180g of mini peanut butter cups and 80g of milk chocolate chips to the batter then fold them in. Transfer the batter to your lined tin and spread it evenly into place.

Step 6: Drizzle 2 tablespoons of peanut butter on top of the batter in the tin then use a toothpick or knife to swirl it around. Add a handful of extra peanut butter cups on top if you like.

Step 7: Bake for around 35 minutes until the brownies have risen and have formed a crust on top. There should still be a slight wobble in the middle.
Step 8: Leave them to cool in the tin then transfer them to the fridge for 6-8 hours to set. Then just pull them out, cut them into slices and enjoy!
Top tips for Reese's brownies
- Refrigeration is KEY! Even after the brownies have cooled, they might still be a little soft until you put them in the fridge for a few hours. Chilling them helps the fat from the butter and the chocolate to resolidify, creating that fudgy texture.
- Make sure to let the melted butter and chocolate mixture cool completely before you add it in with the eggs and sugar. If it's too hot, it can start to cook the eggs a little bit.
- If your peanut butter is quite thick, you can microwave it for 10-15 seconds to loosen it. This will make it much easier for you to swirl it on top of the brownie batter.

FAQs
These will last for a good two weeks, as long as you keep them refrigerated and covered in an airtight container. They do hold up fine at room temperature but for that truly fudgy texture, keep them chilled.
Yes, brownies are one of the best desserts for freezing because they are so dense and thick. You can put them into airtight containers and freeze for up to 3 months, or you can freeze the whole slab wrapped in plastic wrap. To defrost the brownies, transfer them to the fridge and leave them there overnight, or let them sit out at room temperature for an hour or two. Do not refreeze. For more storing and freezing information, check out my how to store brownies guide.
Yes. The mini ones are a little cuter and more convenient but you can chop up the larger ones if that's all you have. You can even put them in whole if you want extra chunky pieces in your brownies.
You can get up to 32 small triangles or 8 extra-large slices out of this brownie slab. It all depends on how big you like your brownies! I typically cut mine into 16 squares.

More brownie recipes:

Reese's Peanut Butter Cup Brownies
Ingredients
- 200 g 70% Cocoa dark chocolate (7oz)
- 180 g Butter (¾ cup)
- 250 g Caster sugar (1+¼ cups)
- 3 Medium Eggs
- 100 g Plain flour (¾ cup + 1 tablespoon)
- 1 Tablespoon Cocoa powder
- 180 g Mini Reese's peanut butter cups (6.5oz)
- 80 g Milk chocolate chips (½ cup)
- 2 Tablespoons Peanut butter
Instructions
- Preheat your oven to 160℃ (140℃ for fan ovens) and line an 8x8-inch tin with baking paper.
- Melt the dark chocolate and the butter together over low heat on the stove then set aside to cool for around 10 minutes.
- Place the sugar and eggs into a large bowl. Use an electric whisk to whisk them together for a few minutes until it increases in volume and looks pale and silky.
- Fold the cooled melted chocolate mixture into the bowl. Then stir in the flour and cocoa powder.
- Gently mix the mini peanut butter cups and chocolate chips in then transfer the batter to your lined tin.
- Drizzle the peanut butter on top of the batter and use a toothpick to swirl it around in a pattern. Top with extra peanut butter cup pieces if you like.
- Bake for around 35 minutes until the brownies have risen and are pulling away from the tin slightly. There should be a very slight wobble in the middle.
- Leave the brownies in the tin until cool then transfer them to the fridge overnight or for at least 6 hours to set. This will make them ultra fudgy and chewy.
- Once set, remove them from the tin, cut into squares and enjoy!
Video
Notes
- Store in an airtight container in the fridge for up to 2 weeks.


Shela Williams
Can't wait to make