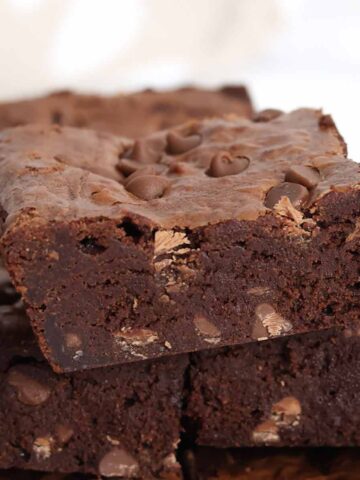
These Milky Bar brownies are fudgy, chewy and filled with delicious chunky white chocolate pieces. They're a perfect dessert for anyone who likes chocolate and they're surprisingly easy to make.

If you're partial to a bit of white chocolate then you're going to love these Milkybar brownies. They're thick and dense just like a good brownie should be, and they're jam-packed with chunky pieces of Milky Bar white chocolate.
If you're new to brownie baking, be sure to read all of the information in the post below. It contains top tips, step-by-step instructions with images and important ingredient and equipment notes. And if you like this recipe, make sure to check out my other Milky Bar desserts: Milky Bar blondies, fudge, cupcakes, cookies & no-bake cheesecake. Enjoy!
Ingredients for this recipe
- Dark chocolate: Dark chocolate is the key ingredient for brownies. It gives a deep, rich flavour and helps determine the texture. Make sure to use 70% dark chocolate for these brownies, or as close to it as you can find. Using low-quality chocolate will result in greasy brownies.
- Butter: Melted butter is the second ingredient that forms the base flavour and texture. Use unsalted butter for this recipe.
- Caster sugar: Caster sugar provides sweetness and moisture in the brownies. If you've never heard of caster sugar before, it can also be called superfine sugar in some places. As the name suggests, it's just a finer version of regular sugar. This kind of sugar dissolves more easily into the fats and helps to improve texture.
- Eggs: You'll need 3 medium eggs, which help with binding, structure and leavening.
- Vanilla extract: If you want a really rich chocolate brownie, you can swap this out for a teaspoon of cold espresso. You won't taste the coffee but it will help to enhance the chocolate flavour.
- Flour: 100g of flour will give this recipe structure, making it more 'fudgy brownie' and less 'lump of fudge'. Make sure to use plain flour for brownies- they're supposed to be dense so they don't need any extra leavening.
- Cocoa powder: This helps to deepen the chocolate flavour. I only use 1 tablespoon so that the brownies are still nice and sweet.
- Milky Bar chocolate: I used one 90g Milky Bar block and 1 share bag of buttons for my Milkybar brownies but feel free to use any combination you want. I just broke the bar into chunks and put the buttons in whole. I personally prefer the chunky texture but you can chop them up into smaller pieces if you like.
Equipment
- Square tin: An 8x8-inch tin is the best size to use for this recipe as it'll give you the best texture and thickness. Using a large tin will result in thinner brownies and you also may need to adjust the baking time and temperature.
- Baking paper: To stop the brownies from sticking to the tin.
- Large mixing bowl: To mix the batter in.
- Utensils: A wooden spoon, a few smaller spoons and a sharp knife.
- Electric hand whisk: For whisking the sugar and eggs together. You can also use a stand mixer if you have one.

How to make Milky Bar brownies
Step 1: First, let's preheat the oven! If you're using a fan oven, it's 140°C, otherwise it's 160°C.
Step 2: Next, we'll melt the butter and chocolate. Break 200g of 70% dark chocolate into pieces and place it into a saucepan with 180g of cubed butter. Place the saucepan over low heat on the stove and stir occasionally until it's fully melted. Then remove it from the heat and let it cool for around 10 minutes, which will prevent it from cooking the eggs in the next step.
Step 3: In a large bowl, use an electric hand whisk to whisk together 3 eggs, 250g of caster sugar and 1 teaspoon of vanilla extract. Stop whisking when the mixture has increased in volume and looks pale and silky- this should only take a minute or two.

Step 4: Pour the cooled chocolate mixture into the bowl and gently fold it in. Then stir in 100g of plain flour and 1 tablespoon of cocoa powder to make a glossy brownie batter.
Step 5: Add 265g of Milky Bar chocolate and stir it in (I used a combination of the chocolate bar and the buttons). Transfer the mixture to your tin and spread it out.

Step 6: Bake your Milkybar brownies for around 35-40 minutes until the edges have risen and a crust has formed on top. There should be a very slight wobble in the middle.
Step 7: Leave them in the tin until cool then put them in the fridge to set, ideally overnight but for at least 6 hours.
Step 8: Once your brownies have set, remove them from the tin and cut them into slices. I usually divide mine into 16 squares but you can make your pieces as big or as small as you like.

Top brownie tips
- Always use 70% dark chocolate for these brownies. Using chocolate with less fat means there will be more sugar in the recipe and will cause oily brownies. Using one with more fat means less sugar and therefore more bitter brownies.
- Let the chocolate and butter mixture cool fully before you add it into the bowl with the eggs and sugar. It can start to cook the eggs if it's still hot.
- These brownies are supposed to be gooey in the middle when you take them out of the oven so the classic toothpick test won't work. Refrigerating the brownies will make them firm and fudgy.
- You'll know they're ready when they've risen, have a thin crust on top and the edges are pulling away from the tin slightly.
FAQ
Keep them in an airtight container in the fridge. They'll last for up to 2 weeks this way! They can also be stored at room temperature but the texture won't be quite as fudgy. For more storing information, check out my post on how to store brownies.
Yes. Put them into airtight containers and freeze them for up to 3 months. When you're ready to eat them, transfer them to the fridge and leave them there overnight to defrost. Do not refreeze.

More brownie recipes:
I hope you like my Milky Bar brownies! If you find this post helpful, please give it a share using the share buttons on this page. Enjoy!

Milky Bar Brownies
Ingredients
- 200 g 70% Cocoa dark chocolate
- 180 g Butter
- 250 g Caster sugar
- 3 Medium Eggs
- 1 Teaspoon Vanilla extract
- 100 g Plain flour
- 1 Tablespoon Cocoa powder
- 265 g Milky Bar chocolate (I used 1 chopped up bar and 1 bag of buttons)
Instructions
- Preheat your oven to 160℃ (140℃ for fan ovens) then line an 8x8-inch tin with baking paper. Set aside for now.
- Melt the dark chocolate and the butter together over low heat on the stove then set it aside to cool for around 10 minutes.
- To a large bowl, add the sugar, eggs and vanilla extract. Use an electric whisk to whisk it all together until pale and silky.
- Fold the melted chocolate mixture into the egg and sugar mixture. Then add the flour and the cocoa powder and mix gently until well combined.
- Stir in the Milky Bar buttons/chocolate chunks then transfer the batter to your lined tin.
- Bake for around 35-40 minutes until the brownies have risen and are pulling away from the tin slightly. There should be a very slight wobble in the middle.
- Leave them in the tin until cool then transfer them to the fridge overnight (or at least 6 hours) until solid.
- Once set, cut them into squares and enjoy!
Video
Notes
- Store in an airtight container in the fridge for up to 2 weeks.


Leave a Reply