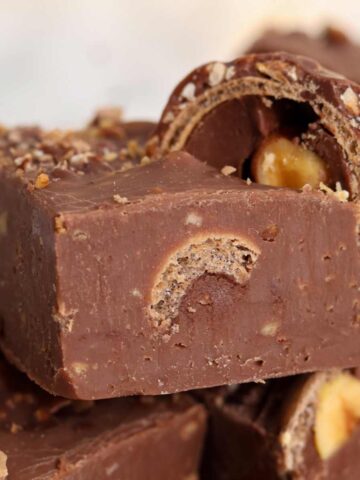
This milk and white chocolate almond bark is super easy to make with just 3 ingredients. It's a quick, kid-friendly, no-bake dessert that you'll want to make again and again.

If you're looking for a quick and easy dessert to take to a party or special event, chocolate bark is just the thing! And if there's anything better than chocolate bark, it's milk AND white chocolate bark. Slap some almonds in there and you have a scrumptious treat that tastes like heaven.
Almond bark vs white chocolate
When I first Googled white chocolate almond bark, I kept coming across the white almond bark bars used for baking, rather than the no-bake chocolate treat I had in mind. It looks just like white chocolate but it's not- so what's the difference?
Almond bark is a type of candy-coating made with vegetable fats, sugar and flavourings. It's made specifically for melting so it's perfect for coating things like truffles and chocolate strawberries.
White chocolate is made with cocoa butter, vanilla, sugar and milk. Although it contains cocoa butter, which provides texture, it's technically not chocolate because it lacks cocoa solids. I'd personally recommend using white chocolate for this bark recipe because it has a richer flavour and texture than almond bark.
Ingredients
There are just 3 simple ingredients needed for this milk and white chocolate almond bark (the clue is in the name, LOL).
- Milk chocolate: I like using milk chocolate for bark because I like my desserts super sweet. Any kind of milk chocolate will work, but I tend to prefer chocolate bars over chocolate chips. If you like things a bit less sweet, you can use semi-sweet or dark chocolate instead.
- White chocolate: Again, any kind of chocolate will work here. I tend to use whatever white chocolate is on special offer at the time!
- Almonds: Of course, you'll need some almonds to make this recipe! I used roasted almonds with sea salt which gave a great flavour- the perfect mix of salty and sweet. I also put mine in whole because I liked the way it looked. You can use any type of almonds you like: salted or unsalted, flaked, blanched, whole or chopped- the choice is yours!

Equipment
- 8x8-inch tin: You can also use a flat tray if you like but it'll spread out more and be thinner. Bark is quite a rustic dessert so it can be any size you want, but I prefer mine on the thicker side.
- Baking paper: Or parchment paper. This will stop the bark from sticking to your tin.
- Microwave or double boiler: For melting the chocolate. You can make your own double boiler at home by gently simmering a small amount of water in a saucepan. Place your heatproof bowl on top of the saucepan, ensuring the bowl doesn't touch the water. The steam will melt your chocolate at a slow and steady pace, preventing it from burning.
- Bowl: A heatproof one!
- Utensils: Something like a wooden spoon or spatula will work just fine for mixing the almonds into the chocolate.
- Sharp knife: Because it contains whole almonds, I found it was easier to just cut the bark with a knife rather than snapping it like I usually do.
How to make milk and white chocolate almond bark
Step 1: Line an 8x8-inch tin with baking paper, ready for the melted chocolate layer.
Step 2: Break up 200g of milk chocolate and place it into a heatproof bowl. You can melt the chocolate in the microwave or by placing the bowl over a saucepan of simmering water to create a double boiler. If using the microwave, make sure to stir the chocolate every 20 seconds or so to prevent burning.

Step 3: Transfer the melted milk chocolate to your lined tin and spread it out in an even layer. Put the bark in the fridge to harden or pop it in the freezer for 10 minutes if you're pressed for time. You can also leave it out at room temperature if you prefer.
Step 4: Next, melt 200g of white chocolate in a heatproof bowl. Once melted, gently stir in 80g of whole almonds.
Step 5: Pour the white chocolate almond mixture over the milk chocolate layer in the tin. Spread it out as evenly as you can then decorate with a few more almonds on top.

Step 6: Put the whole thing in the fridge for an hour or so until fully set. Then use a sharp knife to cut the bark into rough chunks. If you're struggling to cut it, warm the knife up first. You can do this by dipping it into boiling water and wiping it dry immediately before using.
Top tips
- Use real chocolate, not almond bark, for a richer flavour and texture.
- If you like sweet and salty treats, use almonds that have been roasted and salted. The addition of salt goes perfectly with the sweetness of the white chocolate, and the roasted flavour is a nice bonus.
- Use a touch of almond extract in the white chocolate layer for a stronger almond flavour.
- Put the bark in the freezer for 10 minutes to harden the layers in a hurry.
FAQ
You can keep this bark in an airtight container, either in the fridge or at room temperature. If you store it correctly, it should last for up to 3 weeks!
Yes, this treat is great for freezing. I recommend freezing it in airtight containers and then thawing it out in the fridge for a couple of hours. Do not refreeze.
Yes, you can do this by simply swapping the chocolate for dairy-free versions in equal amounts. Using dairy-free chocolate would also make it vegan-friendly in most cases.

More chocolate bark recipes
That's all for now. I hope you have fun making this milk and white chocolate almond bark. If you try the recipe, please leave a comment to let me know how it goes. Enjoy!

Milk & White Chocolate Almond Bark
Ingredients
- 200 g Milk chocolate (7oz)
- 200 g White chocolate (7oz)
- 80 g Whole almonds (1 cup) Plus a few more for topping
Instructions
- Line an 8x8-inch tin with baking paper.
- Melt the milk chocolate and spread it out evenly into the lined tin. Place in the fridge for 30 minutes or freeze for 10 minutes until firm.
- Melt the white chocolate and stir in the whole almonds. Gently spread this over the milk chocolate layer in the tin then top with more almonds.
- Return the bark to the fridge for an hour or so until hard. Then cut into pieces and enjoy!
Video
Notes
- Store in an airtight container at room temperature for up to 3 weeks.

Leave a Reply