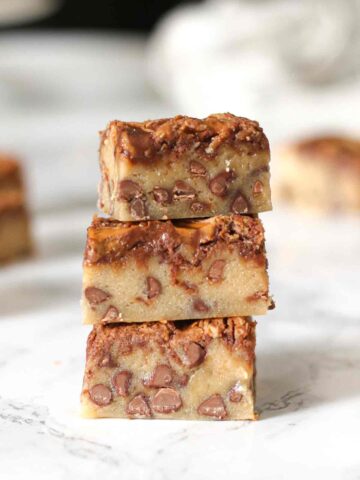
These red velvet blondies are chewy, fudgy and packed full of white chocolate chips. They're bold and vibrant and have a drizzle of that classic cream cheese frosting on top!

Say hello to the ultimate red velvet dessert... red velvet blondies!
These are the third batch of blondies I've made this week, after my Twix blondies and lemon meringue blondies. Since red velvet cake has always been one of my favourite desserts, I just *had* I'd transfer it into blondie form. And now these might just be my new favourite.
They're decadent, dense and fudgy, with that classic blondie chew. And the drizzling of cream cheese just tops them off perfectly. I can't wait for you to try them!
Below I've written detailed instructions, ingredient and equipment notes and my top tips to help you out if you've never made blondies before. If you're a more experienced baker and just want the simple recipe, you can find it in the recipe card at the end of this post. Happy baking!
Ingredients
- Melted butter: For a dense, chewy blondie, you'll want to use melted butter, not softened. Unsalted butter is best unless you're going for the sweet and salty combo.
- Caster sugar: I noticed that many people outside of the UK don't know what caster sugar is but it's simply a finer version of granulated white sugar, also known as superfine sugar. It's somewhere between granulated sugar and icing (powdered sugar), and it helps to improve the texture of baked goods.
- Soft light brown sugar: Soft light brown sugar will give that golden caramel flavour that blondies are known for.
- Eggs: You'll need 3 medium eggs for this recipe.
- Vanilla extract: For flavour.
- Plain flour: Blondies are supposed to be dense and thick so there's no need to use self-raising flour or baking powder.
- Cocoa powder: Red velvet is a mixture of vanilla and chocolate flavours, which is why we need to add cocoa powder. Use only a tablespoon if you want the red colour to come through strong- any more and they're on their way to being brownies.
- Red food colouring: I recommend using food colouring gel instead of liquid. It'll help you get a more vibrant colour with less product, meaning the blondie texture won't be affected.
- White chocolate chips: These are optional but I thought the white colour looked good against the red.
- Cream cheese frosting: Just a drizzle on top, for a true red velvet cake flavour.
Equipment
Aside from the ingredients, you'll also need this equipment for red velvet cake blondies:
- Kitchen scales: Blondies require exact measurements to succeed, so I recommend using a kitchen scale rather than imperial measurements.
- Mixing bowl: A large bowl for making the batter.
- Heatproof bowl: For melting the butter.
- Utensils: I like to mix my ingredients with a wooden spoon and then press the batter into the tin with a rubber spatula (a spatula won't stick to the batter as much as a wooden spoon).
- 8x8-inch tin: This is the perfect size for a thick, fudgy blondie. Using a larger tin will produce thinner, more cakey blondies.
- Baking paper: To prevent sticking.
- Piping bag: Optional but recommended for adding the cream cheese frosting on top. You can use a teaspoon to drizzle it over if you prefer. I used Betty Crocker's cream cheese frosting but you can use whichever kind you like.

How to make red velvet blondies
Step 1: Preheat your oven to 160°C (or 140°C for fan ovens) and line an 8x8-inch tin with baking paper.
Step 2: In a large bowl, mix together 120g melted butter, 130g caster sugar and 130g soft light brown sugar. The mixture should look a bit like wet sand.
Step 3: Stir in 3 medium eggs and 2 teaspoons of vanilla extract to create a silky mixture.
Step 4: Add 200g of plain flour and 1 tablespoon of cocoa powder to the bowl. Mix well to create a smooth, thick batter.
Step 5: Add a small amount of red food gel and mix it in, adding more if needed. Because of the added cocoa powder, you won't be able to get an ultra vibrant red, but more of a bright maroon colour.

Step 6: Add 150g of white chocolate chips to the batter and gently fold them in. Transfer the blondie mix to your lined tin and spread it out evenly.

Step 7: Bake for 35-40 minutes until the edges are firm and pulling away from the tin slightly. There should be a slight wobble in the middle but they should not look wet.
Step 8: Let your red velvet blondies cool in the tin then put them in the fridge for 3-4 hours until firm. This will help them to set properly and give them that delicious fudgy texture.
Step 9: Remove the blondies from the tin and drizzle or pipe a few tablespoons of cream cheese frosting on top. Let the icing harden then cut into squares and enjoy!

Top tips
- Blondies should be underbaked slightly in the middle if you want a fudgy texture so don't worry about a toothpick not coming out clean. You'll know they're done when they're pulling away from the edges and have a slight wobble in the middle.
- Refrigerate the blondies for 3-4 hours to give them the best dense and chewy texture.
- Instead of white chocolate chips, try using cream cheese chips if you can find them! I couldn't get my hands on any but I think they'd make a great addition to this recipe.
- Use the recommended tin size (8x8-inches) for best results. Larger tins will result in thinner brownies that are more cake-like.
- A rubber spatula is useful for pressing the batter into the tin as it won't stick as much as other utensils.
FAQ
If you keep them in an airtight container, they'll last for around 5 days at room temperature and up to a week in the fridge.
Yes, they can be frozen in airtight containers or freezer bags for up to 3 months. To defrost them, transfer them to the fridge and leave them overnight. Do not refreeze.
I recommend using a paste or gel colouring rather than liquid. With liquid colouring, you need to use a lot more to get a vibrant colour which can affect the texture of the blondies. I used Colour Splash paste.

I hope you like these red velvet blondies! If you make them at home, please leave a comment or rating to let me know how it goes. Enjoy!

Easy Red Velvet Blondies
Ingredients
- 120 g Butter, melted then cooled for a few minutes
- 130 g Caster sugar
- 130 g Soft light brown sugar
- 3 Medium Eggs
- 2 Teaspoons Vanilla extract
- 200 g Plain flour (all-purpose)
- 1 Tablespoon Cocoa powder
- Red gel food colouring
- 150 g White chocolate chips
Topping (optional):
- Few Tablespoons Cream cheese frosting (I used a ready-made one but you can use homemade if you prefer)
Instructions
- Preheat your oven to 160℃ (140℃ if you're using a fan oven). Line an 8x8-inch tin with baking paper.
- In a large bowl, mix together the melted butter, caster sugar and light brown sugar.
- Stir in the eggs and vanilla extract.
- Add all of the flour and the cocoa powder. Mix well to make a smooth, thick blondie batter.
- Add the red food colouring, starting with around ¼ teaspoon and adding more if needed.
- Fold in the white chocolate chips.
- Transfer the batter to your lined tin and spread out evenly. Bake for 35-40 minutes, until the edges look firm and are pulling away from the tin slightly. The middle should look baked but still have a slight wobble.
- Leave the blondies in the tin to cool completely then put them in the fridge for 3-4 hours to set. This will make the gooey centre turn firm and fudgy.
- Once set, drizzle some cream cheese frosting on top then cut into squares and enjoy!
Notes
- Store in an airtight container in the fridge for up to 1 week.


Leave a Reply